Adding ambient audio to your images
This page is about the Micrio dashboard version 2, which is outdated. Use the link below to navigate to the latest version.
There are two kinds of audio you can add: positional audio and ambient music. Both are explained in this section.
TIP
for all audio uploads, please use MP3 files, encoded at a web quality bitrate. This is to prevent large downloads. Do not use .RAW, .PCM or .WAV files.
Ambient music
You can upload selected music tracks for your image, which will be played on the background, and muted when other audio (of a video tour or marker-- usually voice-overs) will be playing.
You can adjust the main music volume, and the volume it will fade out to in the Main Image Settings.
Adding music
To add a background music track to your image, click the Music tab under the Audio sidebar, after which you will be able to upload and select music files in the Asset Manager.
Removing music
When there is already music selected in your image, click the delete icon next to it to remove it from the playlist.
Positional audio
Positional Audio allows you to place separate audio samples on specific locations in your image. This results to the user hearing them (in full stereo) when they navigate through those locations in your image.
This is great for ambient audio to add to the experience of your image. Wind audio samples to place in mountains, water audio for water, etc. You can let your imagination run free here.
To activate the editor positional audio mode, open the Positional Audio option in the Audio side bar.
Setting position audio
To add your own positional audio sample, press the + button on the bottom right of the screen. Then the Asset Manager is opened where you can upload new or select existing audio samples.
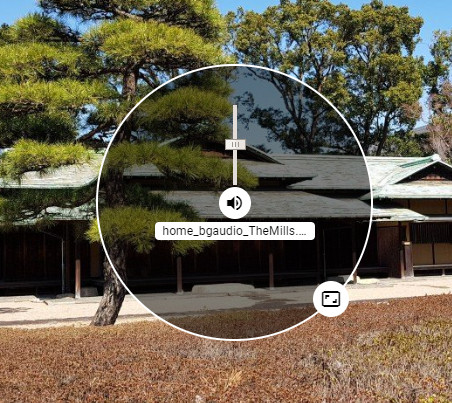
Once you have selected an audio sample, you will see the audio added in the center of your image like this:

There are several ways to control and place the audio:
- Use the speaker icon to move the sample to the desired position in your image
- Use the bottom right icon in the circle to increase or decrease the area where the audio will be heard
- Use the volume slider to set the relative audio volume
- Use the delete icon in the side bar to delete the sample