
A Step-by-Step Guide for 360° E-commerce Product photography
INFO
This feature is available for Enterprise subscription accounts and up.
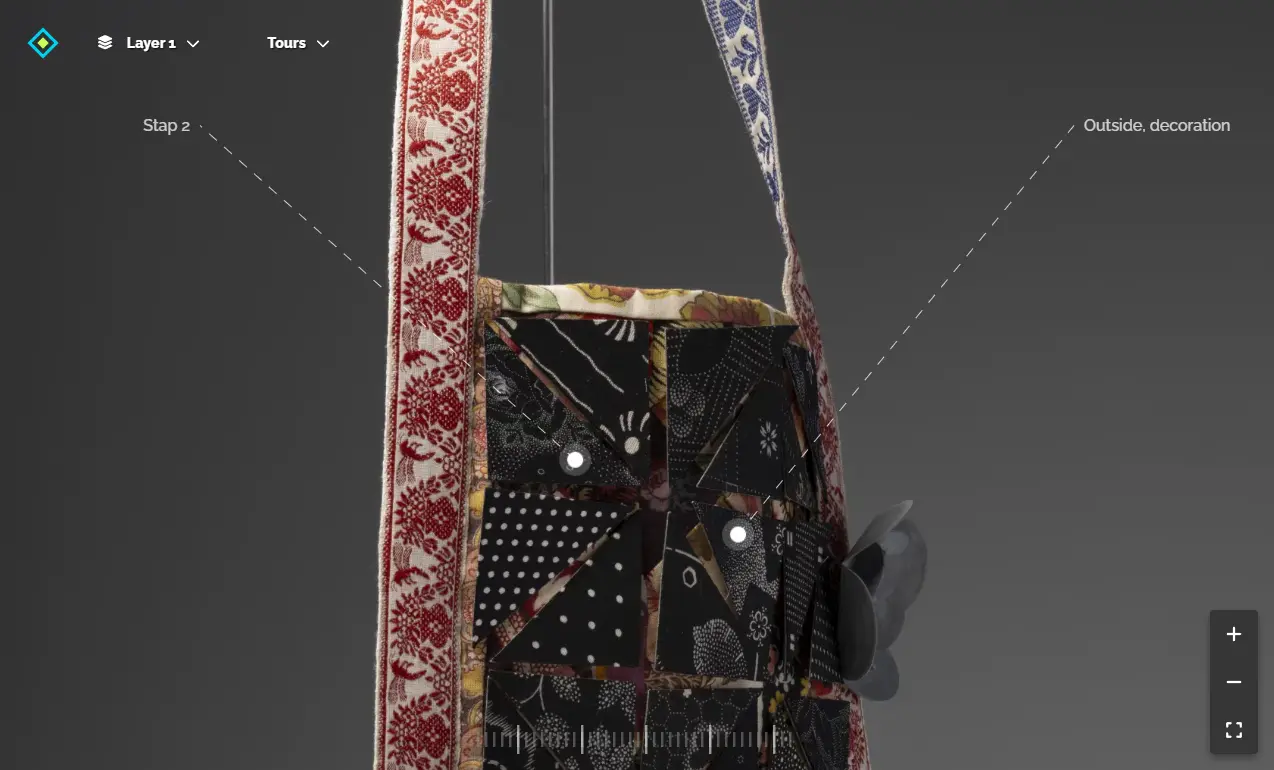
360° objects are a method in Micrio of viewing physical objects photographed from all angles as a single, rotatable object in Micrio.
It retains all Micrio features of extreme resolutions, and added storytelling.
This is great to present physical objects in greatest detail: from museum collections and auction house objects, to luxury products and consumer goods; each object will be presented in the highest quality, enriched with clickable hotspots to present its details best to the viewer.
We have put a large effort into making the uploading, enriching, publishing and viewing of these objects as simple as smooth as possible.
Like Image Albums, 360° objects are published with a greatly optimized single viewing preview package, which brings a smooth viewing experience, and the user will not have any flickering when rotating the image quickly while not all individual image tiles are loaded yet.
This manual outlines the complete process for creating professional 360° product photography using an automated turntable system. The documented setup provides high-quality output suitable for e-commerce applications while maintaining cost efficiency.
System Components
The following configuration has been tested and validated for professional product photography:
Adviced Hardware
| Item | Model | Approximate Cost |
|---|---|---|
| Photography turntable | ComXim Pro | €150 |
| Light Box | Lightdow Photo Studio 12"x12" | €25 |
| Camera | DSLR, ie. Nikon D5300 or similar | €300-400 |
| Remote Shutter cord | For Nikon camera: MC-DC2 (3.5mm) | €8 |
| Camera Stand | Any decent tripod (example) | €40 |
| Memory Card | ie. SanDisk 64GB | €15 |
| SD Card Reader | Any working model (example) | €8 |
| Total Investment | ~€546 - €646 |
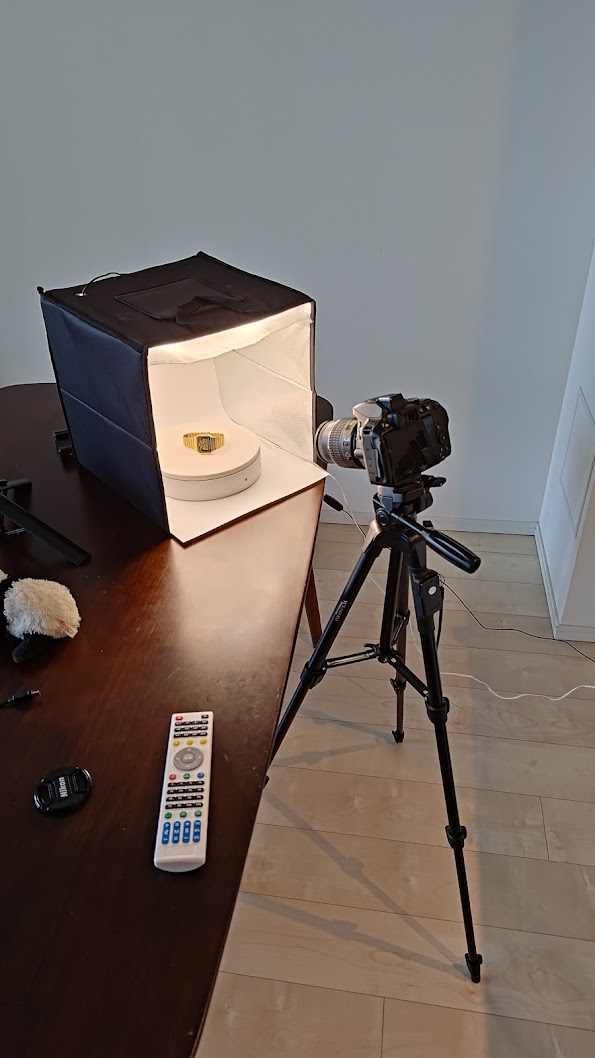
The following image was created with this exact setup:
Initial Setup Procedure
Begin by establishing a dedicated photography station. Select a location with minimal vibration and adequate power access. The working surface must be perfectly level to ensure proper turntable operation. Install the lightbox first, ensuring all panels are clean and properly tensioned. This creates your controlled lighting environment.
Position the turntable within the lightbox, centering it precisely. Use a spirit level to verify horizontal alignment, adjusting the turntable's feet as necessary. The rotation mechanism must be set to operate clockwise for consistent results across all photography sessions.
Camera Configuration and Mounting
Mount the camera on your tripod, positioning it to align precisely with the turntable's center axis. The camera should be perfectly level and parallel to the turntable surface. This positioning is critical for maintaining consistent product perspective throughout the rotation sequence.
Connect the remote shutter cable to the camera's port, typically located on the left side of the body. Route this cable carefully to avoid interference with the camera's movement or view. Connect the other end to the ComXim turntable's control unit, ensuring a secure connection.
The camera requires specific settings for optimal results. Set the mode dial to Manual (M) position. Configure ISO to 100 for maximum image quality. Select an aperture between f/8 and f/11 to achieve appropriate depth of field while maintaining sharpness. Set shutter speed to 1/125 second to prevent any motion blur during capture.
For more general information on taking good photographs, see this tutorial with tips and hints
Capture Sequence Protocol
Product preparation is essential for successful capture. Clean the product thoroughly using appropriate materials for the specific material type. Position the item precisely in the turntable's center, using the provided reference marks for alignment. Verify the product's stability before proceeding.
The ComXim turnable remote control has various options for taking multiple photos for a single rotation of your object. For standard documentation, select 72 frames, creating 5-degree intervals between captures. When additional detail is required, particularly for complex products, use 96 frames for 3.75-degree intervals. Always perform a test rotation without capture to verify proper product positioning and stability.
If your camera is connected by shutter cord to the ComXim turnable, all photography will be done automatically for this sequence.
Image Management and Processing
Upon completion of the capture sequence, remove the memory card and transfer all images via the card reader. Establish a structured file system on your computer, creating separate directories for each captured object. Use a consistent naming convention incorporating product ID and capture date.
Review the entire sequence for technical accuracy. Verify focus consistency across all frames. Check exposure uniformity and ensure the product maintains proper alignment throughout the rotation. Pay particular attention to the consistency of lighting and any unwanted reflections or shadows.
Uploading to Micrio
Option 1: Through the dashboard itself
From the Explorer, choose "New..." -> "360° object". From there, select all images from the object. Then they will be uploaded and processed through your dashboard.
This method is best for low to medium resolution objects, and uploaded as either JPG or WEBP format.
WARNING
If you work with many, or very large source files (ie. original TIF files), this method is non-optimal and possible will not finish correctly, since a lot of GBs will be uploaded through your browser. In that case, use the next method
Option 2: Through the Micrio Image Processing App
To process all images for Micrio locally on your computer, avoiding long upload and processing times, use our Image Processing App, available for Windows and Mac.
After downloading and installing it, you can log in to Micrio, and select the group and target folder to upload your 360° object.
TIP
Make sure you select a group that has 360° objects enabled. If not, you will not see the option to process the image as 360° object in the app.
Then, you can select your image sequence, and each image will be processed on your computer and the results will be directly uploaded to Micrio.
In an example for an image with 72 frames, using high-resolution TIF source files, totalling ~25GB, the total processing and uploading time using this app is around 5 minutes, in comparison to more than an hour using the above method!
Embedding it into your own website
Embedding Micrio images into your own website is very easy. Please refer to our embedding documentation to learn how to do this.
Adding clickable markers
One of Micrio's main features is being able to place markers, or hotspots, to objects, allowing you to tell more about the object's individual features.
You can create markers in the basic Micrio editor of your uploaded object.
Before creating your first marker, be sure to set up the 360° settings of your captured object, so that the markers can be fittingly placed on your object.
After that, follow this page on how to create markers, and how to precisely place them