Camera settings

In the General Camera Settings, you can specify:
Starting view
By default, users will initially see the entire image in its zoomed out state. That means that it's possible that the image does not fill the viewer's entire screen. Here you can set the starting view to:
- Show the full image (default): Show the entire image.
- Open the image filling the screen: The image will fill the viewer's entire viewport, meaning they will not see any margins. It is possible that they will not see the entire image if their viewport ratio differs from the image ratio.
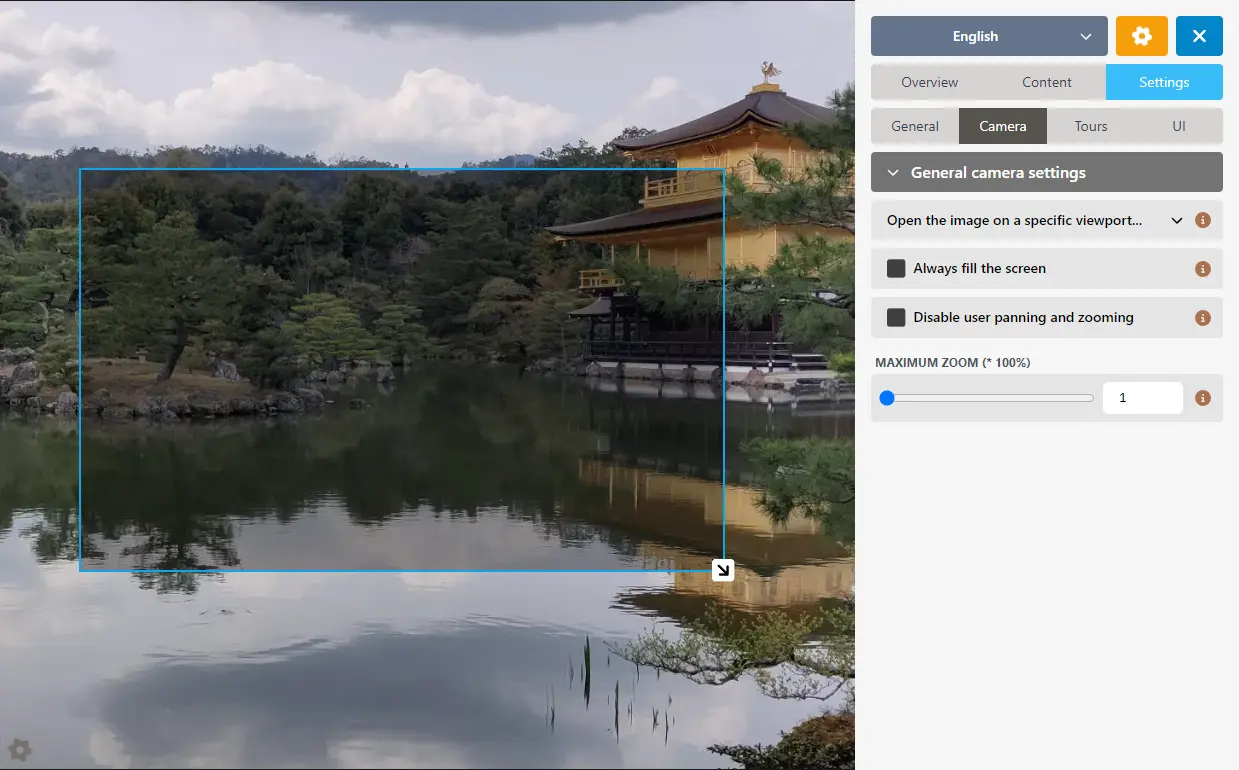
- Open the image on a specific viewport: When selected, you will see a resizable rectangle in the image itself, which will be the opening viewport. This is great for opening on specific image details.
Always fill the screen
WARNING
This option is only visible when the starting view is either "fill the screen", or a specific viewport.
When this option is selected, the user will not be able to zoom out to view the entire image, as the image will always fill the viewer's viewport.
Set a focal point for the opening view
WARNING
This option is only visible when the starting view is "fill the screen"
It's possible that you want to let Micrio fill the screen with the image, but that you still want the image to be focussed on a single focus point.
Using this setting, you can place a focus on a part of the image that will be used as the center point.
TIP
For example: there is a portrait painting where the head of the subject is in the upper region of the image. By default, Micrio would focus on the center of the painting, so it would be possible that part of the subject's head would be cut off at the top of the viewer.
By setting the focal point on the subject's head, this ensures that the head will always be fully focussed and visible when opening the image, no matter the user's screen format.
Set the true north
WARNING
This option only is visible for 360° images
When you want to correct the original orientation of which a 360° image has been taken, for instance to set the opening direction, or to connect it to other 360° images in a more seamless way, you can use this option.
When selected, you can horizontally drag where the true north (center) of the image should be.
Disable user panning and zooming
Select this option if you don't want to allow your users to zoom in and pan through your image themselves, leaving only tours and markers to be able to change the image's views.
Maximum zoom
By default, users can zoom in to 100% of the original image's resolution. In some cases, for instance if the original is not that large, you want users to be able to zoom in more than 100%. By settings this slider, you can manipulate the maximum zoom level (1 = 100%, 2 = 200%, etc).
No smoothing when zoomed > 100%
WARNING
This is only visible when the maximum zoom is > 100%
By default, when a user zooms in more than 100%, the pixels of the image will become blurry. For some scientific purposes such as data presentation, that is not desirable. Selecting this option will show a hard pixelated view when zoomed in > 100%.